Fairwinds Insights Basics Tutorial: How to Resolve Liveness Probe Action Items
Liveness probes are an important type of health check in Kubernetes that determines whether a container is running and responsive. Kubernetes probes can help you identify whether a problem has already occurred or is currently occurring, which can help you ensure that your applications are reliable and responsive. There are many different reasons applications can fail, such as temporary connection issues, application errors, and configuration issues. Liveness probes can help you monitor your applications for issues and improve your resource management by showing you when an application might be running into resource contention.
In a recent post, I explored some of the liveness probes best practices. Liveness probes help you determine the health of an application that is running in a container. If it is in an unhealthy state, Kubernetes will kill the container and redeploy it (or try to — it may not always be successful). These probes can help you determine whether your application is deadlocked or silently unresponsive. One way to configure liveness probes is in the spec.containers.livenessProbe attribute of the pod configuration. Similar to readiness probes, liveness probes run periodically to verify the health of the container.
Why Configure Liveness Probes?
Unfortunately, liveness probes are not always configured when they should be. There are a few reasons you should consider configuring liveness probes in Kubernetes:
-
They can help prevent unhealthy containers from serving traffic. If a container is unhealthy, it may be unable to serve traffic properly, which can lead to errors, outages, and other problems for users of your apps and services. Liveness probes can prevent this by restarting unhealthy containers as soon as they are detected, hopefully before they cause any problems for your users.
-
They can improve the reliability of your Kubernetes clusters. By restarting unhealthy containers, liveness probes help to keep your cluster running smoothly, resulting in better performance and increased uptime for applications and services.
-
They can reduce the load on your Kubernetes clusters. When unhealthy containers are serving traffic, they may overuse resources and starve other containers for resources. Liveness probes help manage the load by restarting unhealthy containers before a misbehaving application consumes more memory or CPU than it has requested.
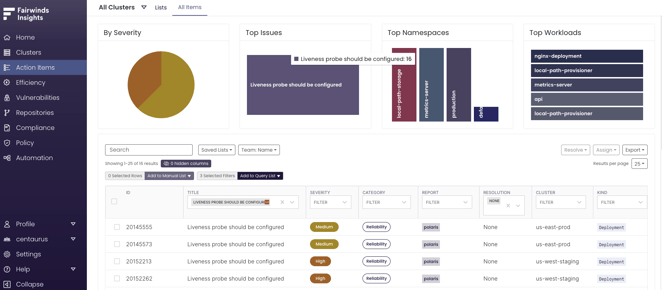
Because liveness probes are a useful way to improve the health and reliability of your Kubernetes cluster, it’s part of the default checks Polaris, an open source configuration validation tool, runs through to improve Kubernetes reliability. Polaris is built into Fairwinds Insights, along with other open source tools, to apply across multiple clusters and enable teams to collaborate consistently across your organization. Polaris checks the health of your Kubernetes clusters by flagging when liveness probes are missing and creating an Action Item in the dashboard, so you can easily see when a liveness probe should be configured and how severe the issue is for the reliability of your cluster.

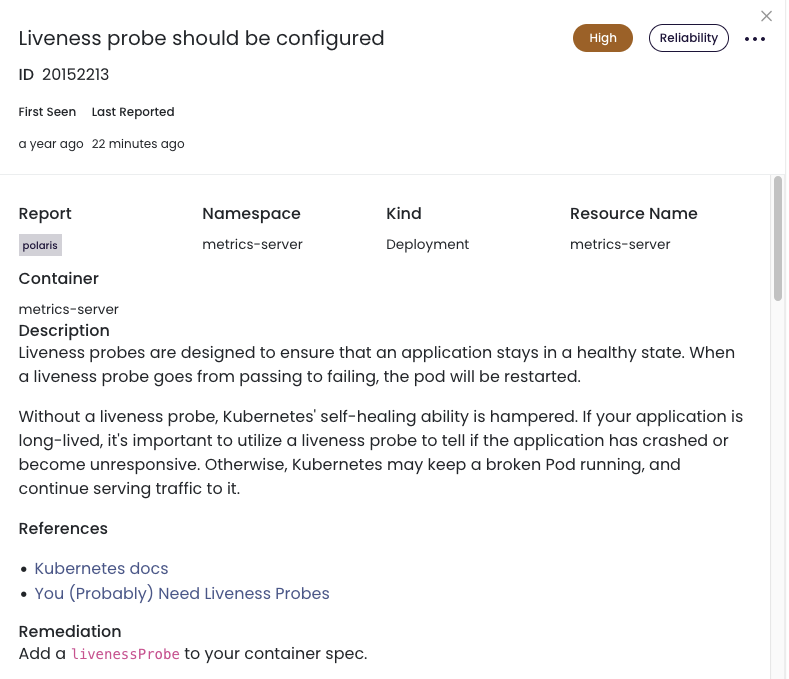
If you click into the issue, you can see more details, including the Resource Name, Container, a description of the problem, references to relevant documentation, remediation steps required, and examples.

To get all the details and links describing how to add a liveness probe, set up Fairwinds Insights. The free tier is available for environments up to 20 nodes, two clusters, and one repo, so you can use it to easily find out if you have workloads that are missing liveness probes.
Resolve the Liveness Probe should be configured Action Item
I created a short video to walk through this process for you to watch as well. In the example, Insights detects a workload that does not have its liveness probes configured. That means the kubelet will not know when it is appropriate to restart this pod if the process were to become deadlocked, leading to potential reliability issues.
In this case, I add a standard HTTP health check by editing the deployment directly in the cluster. While modifying the manifest, navigate down to the container spec and find an appropriate area to add the health check. Now, define the HTTP request that you want to use for the liveness probe, including a path and a port. You also need to provide the initialDelaySeconds, which is how long the probe will wait after the container has started before it begins probing. You need to do that, otherwise it will immediately flag the container as unready before it has had a chance to start up. You also need to include a periodSeconds, which will tell the kubelet how frequently to probe the container to make sure it is still healthy.
Next, you need to restart the deployment to ensure that your changes have been applied and are now live in the cluster. Once the deployment has fully restarted, you can return to Fairwinds Insights. Take a look at your Action Items, filter by “Liveness probe should be configured,” and you can see that the one that was formerly flagged is no longer displaying in your list of action items. That is how you can resolve “Liveness probe should be configured” Action Items in Fairwinds Insights and make your Kubernetes clusters more reliable.
Watch the video to walk through the steps of resolving the Action Item: Liveness probes should be configured one step at a time.


