In the final introduction to Kubernetes series, we’ll take you through how to deploy a multi-tiered web application. The webapp is a key value storage and retrieval service with a Redis backend. (Read problems Kubernetes solves, architecture and definitions or building a K8S cluster in GKE).
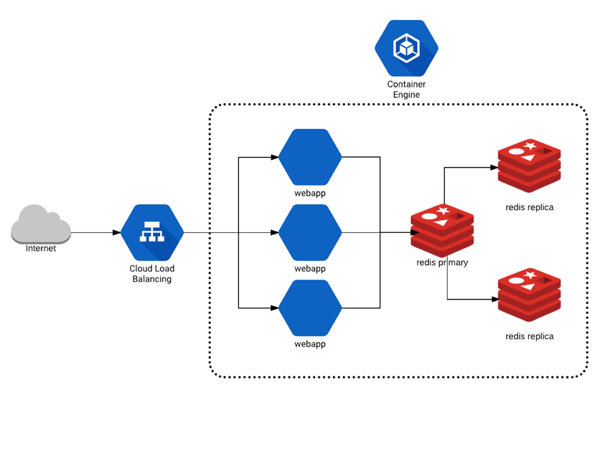
Here’s a quick overview of what we will deploy:

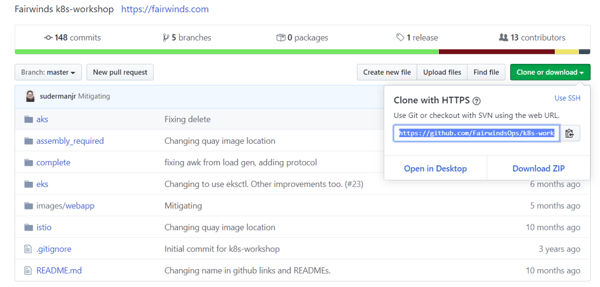
We’ve prepared a GitHub repository that you can clone with all the Kubernetes repository stores, various docs and code Fairwinds uses for workshops.
Go to Git > clone or download > copy the URL.

You’ll need to have a Kubernetes cluster. You can check out our blog on how to build a Kubernetes Cluster with GKE. In GKE, open your cloud shell terminal window then run the command:
git clone https://github.com/FairwindsOps/k8s-workshop.git
It’s a relatively small project so will pull down quickly.
Within the repository, you’ll find a README, assembly required folder, complete folder, images folder and istio folder. For the purposes of this blog, you can ignore all except the README and the complete folders. There are two tracks available in the README. We’ll focus on the basic track, however if you want to dig into problems that could arise when you deploy an application to Kubernetes, you can go back to look at thekub assembly required version of this. It provides more nuance to the Kubernetes YAML that allows you to debug and test your ability to run kubectl commands.
Below are the steps that we'll be using to deploy a complete web app. This blog will deploy a broken application and we'll be fixing the Kubernetes YAML documents to make the deployment successful.
Deploy a Redis Database
In this workshop, you will:
- Deploy a new namespace for your application
- Deploy a Redis server into the new namespace
- Review the objects that you’ve deployed with Kubernetes (deployments, pods)
- Get logs from the deployed resources via kubectl
You’ll first need to provision a namespace. A namespace is a way to segment and bucket objects that you're provisioning in the Kubernetes API. You can check the existing namespaces by running:
kubectl get namespace
danielle@cloudshell:~ (trial-275916)$ kubectl get namespace
NAME              STATUS   AGE
default           Active   75m
kube-node-lease   Active   75m
kube-public       Active   75m
kube-system       Active   75m
In GKE, there are four existing namespaces you can see - default, kube-node-lease, kube-public and kube-system. We are going to create a new namespace:
kubectl apply -f namespace.yml
The -f flag signifies you’re going to pass a file to kubectl for it to submit to the Kubernetes API.
danielle@cloudshell:~ (trial-275916)$ kubectl apply -f namespace.yml
namespace/k8s-workshop created
You can run your get namespace command to see what you’ve created.
danielle@cloudshell:~/k8s-workshop/complete (trial-275916)$ kubectl get namespaces
NAME              STATUS   AGE
default           Active   81m
k8s-workshop      Active   73s
kube-node-lease   Active   81m
kube-public       Active   81m
kube-system       Active   81m
As you move forward, you’ll apply and submit objects to the Kubernetes API all in YAML definition. We will use the kubectl command line tool to take files, parse them and submit to the API.
First Tier Web Application: Redis
You’ll now deploy the first tier of the web application starting with your stateful back-end that stores state for the webapp. kubectl allows you to take a series of YAML files, put them in a folder and run kubectl apply -f against an entire folder. It will provision all of the resources and objects defined underneath the folder. This allows you to create a grouping of objects and mini-YAML files instead of having a single YAML file with a thousand lines defining everything. You’ll first roll out the back-end tier of this multi-tier web application - an HA Redis implementation. To have a look around, you can runls -l 01_redis/
danielle@cloudshell:~/k8s-workshop/complete (trial-275916)$ ls -1 01_redis/
redis.networkpolicy.yml
redis-primary.deployment.yml
redis-primary.service.yml
redis-replica.deployment.yml
redis-replica.horizontal_pod_autoscaler.yml
redis-replica.service.yml
There is a sequence of files under this.
-
The deployment file defines the number of pods that are spun up (refer back to Kubernetes architecture basics and definitions for more info).
-
You’ll see the service file that will define a clusterIP service (clusterIP because you don’t want Redis exposed to the public internet).
-
This is a HA Redis implementation so you will have a deployment file for your replica and a horizontal pod autoscaler (HPA) for your replica. The autoscaler allows you to automatically scale based on resource requests that are set on the deployment.
-
You also have a service available for the replica so the master can talk to the replica and a network policy for redis.
You can look into the files to see what the definitions look like. In your text editor, open the redis-primary deployment file:
vim redis.primary.deployment.yml
You’ll see an API version to talk to, a kind (where you designated the object you will submit), the metadata, and a specification on what the deployment should look like.
apiVersion: extensions/v1beta1
kind: Deployment
metadata:
  name: redis-primary
  namespace: k8s-workshop
spec:
  replicas: 1
  template:
    metadata:
      labels:
        app: redis
        role: primary
        tier: backend
    spec:
      containers:
      - name: redis
        image: gcr.io/google_containers/redis:e2e  # or just image: redis
        resources:
          requests:
            cpu: 100m
            memory: 100Mi
        ports:
        - containerPort: 6379
In this case, you’ll provision one replica (i.e. one pod is part of the deployment). You’ll template out the spec you want in your template.spec. You can also define a set of containers. In this example, you’ll only have one container to spin up. The name of the container is Redis pulled from the Google Container Registry. You’ll aso make some resource requests that you’ll attach to the container—allocate 100 CPU shares, 100 MB of memory and networking to expose port 6379 which is redis default. You can dig around in the YAML definitions more and play with adding more containers or replicas.
Apply YAML to Cluster
You’ll now apply your YAML definitions to the cluster. Run:
kubectl apply -f 01_redis/
This command went through all the files reviewed above and created objects for each one of them.
danielle@cloudshell:~/k8s-workshop/complete (trial-275916)$ kubectl apply -f 01_redis/
deployment.extensions/redis-primary created
service/redis-primary created
deployment.extensions/redis-replica created
horizontalpodautoscaler.autoscaling/redis-replica created
service/redis-replica created
networkpolicy.networking.k8s.io/redis created
Now you’ll want to read those objects and get data on what’s running.
kubectl -n k8s-workshop get pod
You’ll see you have two pods running - A Redis primary and replica.
NAME                             READY   STATUS    RESTARTS   AGE
redis-primary-684c84fc56-57brt   1/1     Running   0          75s
redis-replica-d64bd9565-zn7sg    1/1     Running   0          74s
Now take the same step for the deployments:
kubectl -n k8s-workshop get deployments
You’ll see information about your deployments—the Redis replica, redis primary, the desired count of 1, current 1, up to date, what’s available and the age of the pod.
NAME            READY   UP-TO-DATE   AVAILABLE   AGE
redis-primary   1/1     1            1           2m37s
redis-replica   1/1     1            1           2m36s
If you are doing a rolling deployment, you’ll see more interesting information here about the state of an application.
You can also look at services by running:
kubectl -n k8s-workshop get services
Here you can see the two services—the primary and replicas.
NAME            TYPE        CLUSTER-IP   EXTERNAL-IP   PORT(S)    AGE
redis-primary   ClusterIP   10.8.11.78           6379/TCP   5m35s
redis-replica   ClusterIP   10.8.4.228           6379/TCP   5m34s
Both of these services are clusterIP services (i.e. only available on the IP that’s internal to the cluster). You’ll also see the IPs and some info on ports and age. If you wanted to summarize in a single command, you run:
kubectl -n k8s-workshop get deployments,pods,services
This allows you to show all the resources in a single image.
NAME                                  READY   UP-TO-DATE   AVAILABLE   AGE
deployment.extensions/redis-primary   1/1     1            1           6m42s
deployment.extensions/redis-replica   1/1     1            1           6m41s
NAME                                 READY   STATUS    RESTARTS   AGE
pod/redis-primary-684c84fc56-57brt   1/1     Running   0          6m42s
pod/redis-replica-d64bd9565-zn7sg    1/1     Running   0          6m41s
NAME                    TYPE        CLUSTER-IP   EXTERNAL-IP   PORT(S)    AGE
service/redis-primary   ClusterIP   10.8.11.78           6379/TCP   6m42s
service/redis-replica   ClusterIP   10.8.4.228           6379/TCP   6m41s
Working through these steps, you should now see a healthy redis master and replica in the k8s-workshop namespace in Kubernetes.
Deploying the Web App
Next you will:
- Deploy the web app into the
defaultnamespace (A different namespace from the one we created above) - Watch the Cloud Load Balancer create external access to the web app
- CURL the newly deployed web app to test manually
- Look at the logs of the web app
- Fix the broken web app deployment by deploying to the correct namespace
- CURL the web app again to test
Start by doing a listing of the webapp directory ls -l 02_webapp/ to see that it has similar files to the redis backend.
danielle@cloudshell:~/k8s-workshop/complete (trial-275916)$ ls -1 02_webapp/
app.configmap.yml
app.deployment.yml
app.horizontal_pod_autoscaler.yml
app.networkpolicy.yml
app.secret.yml
app.service.yml
There are two new object types: a configmap and a secret.
- A configmap offers ways to source environment variables and static files into your pod. If you look at the configmap YAML file, a hierarchical sequence of keys that you can drill into.
- A secret allows you to store and manage sensitive information, such as passwords, OAuth tokens, and ssh keys.
To deploy the basic webapp:
kubectl apply -f 02_webapp/
This deploys all the yaml definitions in the 02_webapp/ folder. Note that we are not defining the namespace in the metadata of the YAML, so it will default to the default namespace configured with kubectl.
danielle@cloudshell:~/k8s-workshop/complete (trial-275916)$ kubectl apply -f 02_webapp/
configmap/webapp created
deployment.extensions/webapp created
horizontalpodautoscaler.autoscaling/webapp created
networkpolicy.networking.k8s.io/app created
secret/webapp created
service/webapp created
You can take a look at the configmap you created and are referencing in the deployment by running kubectl -n k8s-workshop get configmaps you’ll see that there are no resources found.
danielle@cloudshell:~/k8s-workshop/complete (trial-275916)$ kubectl -n k8s-workshop get configmaps
No resources found in k8s-workshop namespace.
In this intentional example, you’ll see an instance where a parameter was missed. You are looking at the default namespace and specifying the k8s-workshop namespace every time you deploy or to try to read information back.
In this example, the 02_webapp/ implementation got deployed into the default namespace. To check this, run:
kubectl get configmaps
You’ll see that you have the webapp configmap in there, but it’s deployed to the wrong namespace.
danielle@cloudshell:~/k8s-workshop/complete (trial-275916)$ kubectl get configmaps
NAME     DATA   AGE
webapp   2      4m8s
You’ll need to rerun the apply and specify the namespace. The reason is if you look at the 01_redis primary deployment, you specified a namespace. If you look at the same deployment for webapp, you’ll see under metadata, you didn’t supply a namespace.
You’ll need to back out the last apply with kubectl delete -f 02_webapp/ to delete the objects created and correctly deploy into the k8s-workshop namespace.
danielle@cloudshell:~/k8s-workshop/complete (trial-275916)$ kubectl delete -f 02_webapp/
configmap "webapp" deleted
deployment.extensions "webapp" deleted
horizontalpodautoscaler.autoscaling "webapp" deleted
networkpolicy.networking.k8s.io "app" deleted
secret "webapp" deleted
service "webapp" deleted
Now you’ll apply in the proper namespace.
kubectl apply -f 02_webapp/ --namespace k8s-workshop
This overrides the unset default namespace and deploys all the yaml files into the k8s-workshop namespace.
danielle@cloudshell:~/k8s-workshop/complete (trial-275916)$ kubectl apply -f 02_webapp/ --namespace k8s-workshop
configmap/webapp created
deployment.extensions/webapp created
horizontalpodautoscaler.autoscaling/webapp created
networkpolicy.networking.k8s.io/app created
secret/webapp created
service/webapp created
Next, run kubectl get services --namespace k8s-workshop.
danielle@cloudshell:~/k8s-workshop/complete (trial-275916)$ kubectl get services --namespace k8s-workshop
NAME            TYPE           CLUSTER-IP   EXTERNAL-IP   PORT(S)        AGE
redis-primary   ClusterIP      10.8.11.78           6379/TCP       19m
redis-replica   ClusterIP      10.8.4.228           6379/TCP       19m
webapp          LoadBalancer   10.8.7.188   34.72.33.15   80:31550/TCP   48s
You can see that there is a Load Balancer IP pending. If you give it a few minutes, the Load Balancer IP will have changed.
Now you have the front end tier of the webapp running.
Accessing Your Services
Now you can take a look at the services available to see how you might actually access the webapp.
kubectl -n k8s-workshop get services
You can see that you have both services attached to Redis which are ClusterIP services only accessible from within the cluster. You’ll also see the third service, the webapp, which is exposed publicly because it’s a load balancer service. When you list services, you get an external IP.
danielle@cloudshell:~/k8s-workshop/complete (trial-275916)$ kubectl -n k8s-workshop get services
NAME            TYPE           CLUSTER-IP   EXTERNAL-IP   PORT(S)        AGE
redis-primary   ClusterIP      10.8.11.78           6379/TCP       20m
redis-replica   ClusterIP      10.8.4.228           6379/TCP       20m
webapp          LoadBalancer   10.8.7.188   34.72.33.15   80:31550/TCP   97s
If you copy the external IP, open a web browser, you can see that our webapp is serving Hello from Kubernetes.

To check that this specific pod and the container inside the pod is actually getting traffic, you first need to get the name of the actual pod running: kubectl -n k8s-workshop get pods
You’ll see that there is one webapp pod running. Copy the full name of the pod.
danielle@cloudshell:~/k8s-workshop/complete (trial-275916)$ kubectl -n k8s-workshop get pods
NAME                             READY   STATUS    RESTARTS   AGE
redis-primary-684c84fc56-57brt   1/1     Running   0          25m
redis-replica-d64bd9565-zn7sg    1/1     Running   0          25m
webapp-54c7b758f5-sxjgp          1/1     Running   0          6m43s
Run kubectl -n k8s-workshop logs -f webapp-54c7b758f5-sxjgp
You’ll see that there is one webapp pod running.
10.4.0.1 - - [11/May/2020:20:50:11 +0000] "GET / HTTP/1.1" 200 70 0.0030
10.4.0.1 - - [11/May/2020:20:50:14 +0000] "GET / HTTP/1.1" 200 70 0.0029
10.4.0.1 - - [11/May/2020:20:50:17 +0000] "GET / HTTP/1.1" 200 70 0.0045
10.4.0.1 - - [11/May/2020:20:50:18 +0000] "GET / HTTP/1.1" 200 70 0.0029
10.4.0.1 - - [11/May/2020:20:50:20 +0000] "GET / HTTP/1.1" 200 70 0.0030
10.4.0.1 - - [11/May/2020:20:50:23 +0000] "GET / HTTP/1.1" 200 70 0.0030
10.4.0.1 - - [11/May/2020:20:50:26 +0000] "GET / HTTP/1.1" 200 70 0.0030
10.4.0.1 - - [11/May/2020:20:50:28 +0000] "GET / HTTP/1.1" 200 70 0.0030
10.4.0.1 - - [11/May/2020:20:50:29 +0000] "GET / HTTP/1.1" 200 70 0.0035
10.4.0.1 - - [11/May/2020:20:50:32 +0000] "GET / HTTP/1.1" 200 70 0.0030
10.4.0.1 - - [11/May/2020:20:50:35 +0000] "GET / HTTP/1.1" 200 70 0.0031
10.4.0.1 - - [11/May/2020:20:50:38 +0000] "GET / HTTP/1.1" 200 70 0.0029
10.4.0.1 - - [11/May/2020:20:50:38 +0000] "GET / HTTP/1.1" 200 70 0.0044
10.4.0.1 - - [11/May/2020:20:50:41 +0000] "GET / HTTP/1.1" 200 70 0.0032
10.4.0.1 - - [11/May/2020:20:50:44 +0000] "GET / HTTP/1.1" 200 70 0.0031
10.4.0.1 - - [11/May/2020:20:50:47 +0000] "GET / HTTP/1.1" 200 70 0.0030
10.4.0.1 - - [11/May/2020:20:50:48 +0000] "GET / HTTP/1.1" 200 70 0.0027
10.4.0.1 - - [11/May/2020:20:50:50 +0000] "GET / HTTP/1.1" 200 70 0.0031
You can see internal health check requests to see that the pod is live. If you go back to the browser and hit refresh, you’ll see the different git requests against the base URL coming through. You’ll know that from the public internet, there is access to your webapp running in your Kubernetes cluster.
10.4.0.1 - - [11/May/2020:20:51:38 +0000] "GET / HTTP/1.1" 200 70 0.0030
10.4.0.1 - - [11/May/2020:20:51:38 +0000] "GET / HTTP/1.1" 200 70 0.0029
10.4.0.1 - - [11/May/2020:20:51:38 +0000] "GET /favicon.ico HTTP/1.1" 200 37 0.0020
10.128.0.22 - - [11/May/2020:20:51:38 +0000] "GET / HTTP/1.1" 200 70 0.0027
10.128.0.22 - - [11/May/2020:20:51:38 +0000] "GET /favicon.ico HTTP/1.1" 200 37 0.0010
10.128.0.22 - - [11/May/2020:20:51:38 +0000] "GET / HTTP/1.1" 200 70 0.0028
10.128.0.22 - - [11/May/2020:20:51:38 +0000] "GET /favicon.ico HTTP/1.1" 200 37 0.0010
10.128.0.22 - - [11/May/2020:20:51:38 +0000] "GET / HTTP/1.1" 200 70 0.0027
10.4.0.1 - - [11/May/2020:20:51:38 +0000] "GET / HTTP/1.1" 200 70 0.0081
10.128.0.22 - - [11/May/2020:20:51:38 +0000] "GET /favicon.ico HTTP/1.1" 200 37 0.0011
10.128.0.22 - - [11/May/2020:20:51:38 +0000] "GET / HTTP/1.1" 200 70 0.0027
10.128.0.22 - - [11/May/2020:20:51:38 +0000] "GET /favicon.ico HTTP/1.1" 200 37 0.0012
10.4.0.1 - - [11/May/2020:20:51:39 +0000] "GET / HTTP/1.1" 200 70 0.0028
10.4.0.1 - - [11/May/2020:20:51:39 +0000] "GET /favicon.ico HTTP/1.1" 200 37 0.0010
10.4.0.1 - - [11/May/2020:20:51:39 +0000] "GET / HTTP/1.1" 200 70 0.0029
10.4.0.1 - - [11/May/2020:20:51:39 +0000] "GET /favicon.ico HTTP/1.1" 200 37 0.0010
10.128.0.22 - - [11/May/2020:20:51:39 +0000] "GET / HTTP/1.1" 200 70 0.0028
10.128.0.22 - - [11/May/2020:20:51:39 +0000] "GET /favicon.ico HTTP/1.1" 200 37 0.0010
10.128.0.22 - - [11/May/2020:20:51:39 +0000] "GET / HTTP/1.1" 200 70 0.0028
10.128.0.22 - - [11/May/2020:20:51:39 +0000] "GET /favicon.ico HTTP/1.1" 200 37 0.0010
10.4.0.1 - - [11/May/2020:20:51:39 +0000] "GET / HTTP/1.1" 200 70 0.0027
10.4.0.1 - - [11/May/2020:20:51:39 +0000] "GET /favicon.ico HTTP/1.1" 200 37 0.0010
10.4.0.1 - - [11/May/2020:20:51:39 +0000] "GET / HTTP/1.1" 200 70 0.0028
10.4.0.1 - - [11/May/2020:20:51:39 +0000] "GET /favicon.ico HTTP/1.1" 200 37 0.0010
10.4.0.1 - - [11/May/2020:20:51:41 +0000] "GET / HTTP/1.1" 200 70 0.0030
You have now have deployed a multi-tier web application into Kubernetes. This is just the tip of the iceberg and there are many ways that you can orchestrate workloads and applications in Kubernetes.


